Hello, my stamping friend.
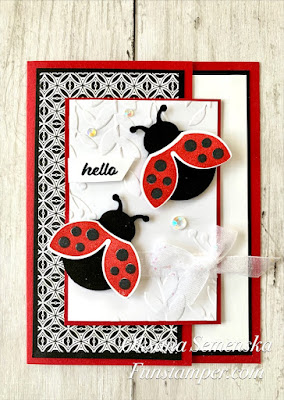
I have a fun card to share with you today. We made this card back in February at my Crafting Happy Hour class. It features Hello Ladybug bundle.
Measurements:
- Real Red CS: 5 ½ x 7 ¼”; 2 ¾ x 4”;
- Basic White CS: 2 5/8 x 3 7/8”; 3 ¾ x 5”; scrap for a stamping.
- Basic Black CS: 2 5/8 x 5 1/8”; 3 7/8 x 5 1/8”; scrap for punching
- DSP: 2 ½ x 5”
Instructions:
- Score Real Red CS on 7 ¼” side at 4 ¼”.
- Adhere DSP to corresponding Basic Black piece, adhere to the front of the card.
- Adhere larger piece of basic white to the basic black piece. Adhere inside of the card.
- Emboss basic white piece using greenery embossing folder. Wrap piece of a ribbon around it securing on the back. Adhere to the real red CS.
- Punch 2 ladybug bodies from basic black CS.
- Stamp wings 2 times in real red ink and centers in memento black on scrap of basic white. Punch wings with a punch. Add wings to the bodies with dimensionals.
- Add 2 ladybugs to the embossed piece with dimensional,
- Stamp “Hello” in memento black on a skinny strip of basic white. Trim to the needed sized. Add with dimensionals.
- Adhere a piece with ladybugs to the card front with dimensionals – make sure you add dimensionals only to the left side.
- Add a bow with a glue dot.
- Add few rhinestones.
If you need any supplies - visit my online store , hostess code is 49HGHSBV. Thank you for your support.
Happy Stamping!


No comments:
Post a Comment