Monday, May 29, 2023

Cheerful Daisies Class Recap

 Hello, my stamping friend.

This weekend I held 2 in-person classes featuring Cheerful Daisies suite of products.

I chose classic color combination - Crushed Curry/lemon Lolly and Garden Green. And everything in this class was about daisies, even my glasses:
Here is fun favors I made for everybody:


We made 5 cards, 2 of them were funky folds. Everybody loved the cards and few ladies completely changed their mind about this bundle!
I am offering this class To Go as well:


Check the To Go option! Few extra kits are available.

Happy Stamping!


Tuesday, May 23, 2023

Cheerful Daisies Class

 Hello, my stamping friend!

Here is a card we made during Crafting Happy Hour Class. 

This is a slight modification from the funky fold cards we created during FB live. If you misses it - here is the post.

I decided to make daisies white and lightly sponge them with lemon lolly ink.

The Cheerful Daisies is such a fun bundle. I just can not get enough of it! I love it so much that I decided to have a live class this weekend using this suite of products. 


Check the To Go option!

Happy Stamping!

Monday, May 15, 2023

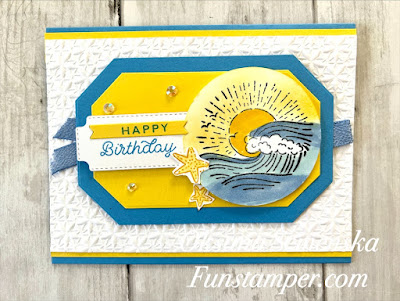
Circle Sayings in Azure Afternoon

Hello, my stamping friend.

Today I have a fun card for you. We created this card during the Catalog Kick Off class. It features Circle Sayings bundle (stamp set and circle punch) and brand new color - Azure Afternoon.


 This color combination remains me of my Ukrainian Flag. 

Measurements: 

  • Azure Afternoon CS: 5 ½ x 8 ½ "; 3 ½ x 5” 
  • Basic White CS: 3 ¾ x 5 ½”; piece for a label and stamping.
  • Daffodil Delight CS: (2) ½ x 5 ½”; 3 x 5"; scrap 

Instructions:

  1. Emboss basic white cardstock. Adhere strips of the daffodil delight to the top and bottom. Adhere to the card base. 
  2. Die cut labels from azure artemon and daffodil delight cardstock. Adhere them together. 
  3. Stamp a sentiment in azure afternoon ink on basic white and daffodil delight pieces. Die cut basic white using a label from Cheerful Daisies dies; die cut word “Happy” from daffodil delight using countryside iconners die (smallest one). Set aside. 
  4. Stamp a sun image in memento black ink on basic white piece. Punch it out. 
  5. Color the sun and the waves with blends. Sponge around the sun using sponge dauber and daffodil delight ink. 
  6. Add white Happy Birthday sentiment to the left side of the label with dimensionals. Add the circle image to the right side with dimensionals. Adhere daffodil delight “Happy” banner over the basic white. 
  7. Stamp a shell image in daffodil delight on a basic white scrap. Color with a light blend. Fussy cut few shells. Add them with dimensionals. 
  8. Fold about 3” of ribbon making a loop and adhere to the right side of the label. Fold another 3” of the ribbon making tales – add to the left side of the label. 
  9. Add label with dimensionals to the center of the card. 
  10. Add few rhinestones. 

This stamp set is a must for quick and easy cards!

Happy Stamping!

Saturday, May 13, 2023

Crafting with You Fun Creations Club

If crafty is your lifestyle, the Crafting with You club has you covered! The May club features Crafting with You bundle and the things crafters love: paintbrushes, an easel, knitting needles, yarn, a basket, a sewing machine, even a Stampin’ Cut & Emboss Machine. And the crafting-themed sentiments will speak to you as well as those who receive your handmade cards.
We will be creating 8 cards (2 ea of 4 designs) plus a Home Decor! 

Subscription window: April 16th 2023 - May 15th, 2023 
Shipping by May 25, 2023 (pending any back-ordered items)

Suggested supplies: Crafting with You bundle and just 2 inks (Misty Moonlight and Flirty Flamingo). You can substitute them both to what you have (Night of navy and any other contrast color will work)

Note: you can always substitute. Bundle is strongly recommended. 

Subscribe today!

Friday, May 12, 2023

Lemon Lolly Card and a Treat Box

 Hello, my stamping friend.

Last week during FB Live I promised I will create a lemon lolly version of the card and a box. Here it is:


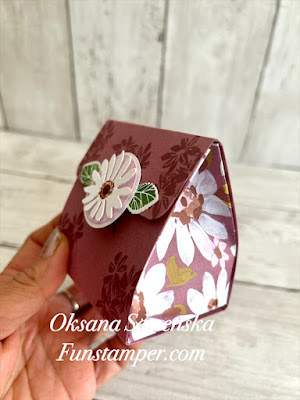
And a box is so cute:

This is the exactly the same version I shared early. Check my post here. I love this DSP with so many possibilities.

Which color is your favorite?

Give this fold a try!
Need supplies? Visit my store . Host code YJP9KN4U. 

Happy Stamping!

Thursday, May 11, 2023

Cheerful Daisies Pocket Fold Card and a Treat

 Hello, my stamping friend.

Today I have another fun card and a treat box featuring Cheerful Daisies suite of products. 

We created both projects during FB live. We all voted and moody mauve color combo was picked.

The card is a funky fold. I made this fold few years ago and decided to recreate it with new products.

For both projects only 1 sheet of the card stock is needed. It was fun creating few versions of the card and a box using different color schema.

Measurements (Card):

  • Card stock: 5 1/2 x 9 1/2", score at 2 1/2 and 6 3/4"
  • DSP: 4 x 5 1/4";
  • Card stock (inside) 4 x 5 1/4"
  • Basic White: 3 3/4 x 5"

Box:

  • Card Stock: 3 x 9 1/2"; score at 3, 5, 8 and 8 1/8
  • DSP: (2) 3 x 3 1/2" scored at 12: on 3 sides.

Watch the recording how to make both projects: 

 Here is few more pictures using another pattern of the DSP.


Give this fold a try!
Need supplies? Visit my store . Host code YJP9KN4U. 

Happy Stamping!