Thursday, June 29, 2017

Daisy Delight is Back

Hello, my stamping friend.
I am back from my 4 weeks amazing trip with my family. I missed my stamping room and all my new goodies from the Annual Catalog that were waiting for me home. Classes are scheduled, ribbon share done, now is a time to update my blog.
I want to let you know that Daisy Delight punch and bundle are back. They were so popular, that punch was sold out during a pre-order and was not available when catalog went live! I was the lucky one to get it, but was not able to have plan the class. Now it is back! Order yours as supplies are limited.
Here is a card for you using this bundle:
This card will look great in any color, don't you think?
Instructions:
  1. Stamp the daisy image in Calypso Coral ink on the Calypso Coral card base, then rotate the stamp and stamp again to create a fuller flower. Repeat to cover the card base. Color the flowers using Calypso Coral and Daffodil Delight Watercolor Pencils. 
  2. Cut two hollow squares from Soft Sky Cardstock using the Big Shot and the Stitched Shapes Framelits Dies. Adhere them to the card using Mini Stampin’ Dimensionals. 
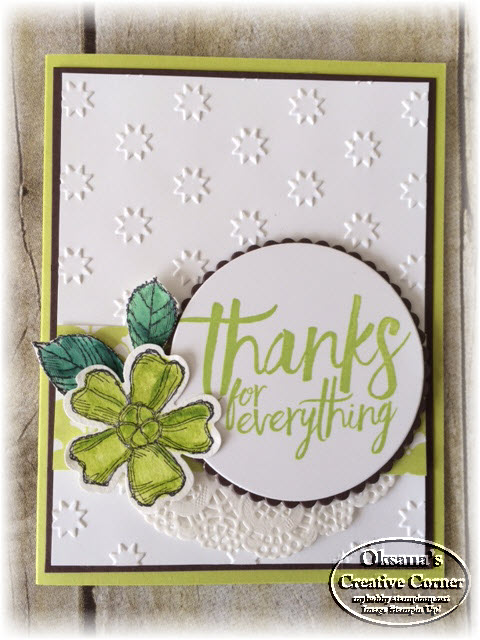
  3. Fold and adhere a piece of 1/2" Lace Trim to the card. 
  4. Stamp large and small daisies in Calypso Coral ink on Whisper White Cardstock. Color the images using the Calypso Coral Watercolor Pencil. Punch out the two large daisies using the Daisy Punch; offset and adhere together using a Stampin’ Dimensional. Cut out the three smaller daisies. Wind a length of Silver Metallic Thread and adhere the thread and all the daisies to the card. 
  5. Stamp a flower center in Daffodil Delight ink on Whisper White Cardstock and color it with the Daffodil Delight Watercolor Pencil. Cut it out and adhere it to the center of the large daisy. 
  6. Stamp the sentiment in Old Olive ink on a piece of Whisper White Cardstock by combining words from separate stamps. 
  7. Stamp three leaves in Old Olive ink on Whisper White Cardstock. Color them using the Old Olive Watercolor Pencil. Cut them out and adhere the leaves to the card using Mini Stampin’ Dimensionals. Adhere three Rhinestone Basic Jewels to the card.
Happy Stamping!
Product List

Friday, June 16, 2017

Happy Birthday, Gorgeous

Hello, my stamping friend.
"Happy Birthday, Gorgeous" is a new fun stamp set. It is not only has many great sentiments in funky fonts, but many great images to create a collage. They range from flowers to balloons and cab be used for any gender and age cards. I choose to start with flowers (no surprise here, as I just in love with any flowery images). I also used 2 new in-colors, but this card can be defiantly created in any color combo:
Want to know how to make it?

Cutting Measurements:
  • Berry Burst: 5 ½ x 8 ½” 
  • Whisper White CS: 3 x 4” and piece for punching 
  • Old Olive CS: 3 ¼ x 4 ¼” and piece for punching 
  • Designer paper: 1 ½ x 5 1/2” 
Instructions: 
  1. Create card front from Berry Burst CS by scoring at 4 ¼”. Using outlined flower stamp randomly stamp the right side of the card front in Berry Burst Ink. Adhere designer paper to the left side of the card front. 
  2. Stamp few small and big solid flowers in powder pink ink on top left and bottom right of whisper white CS leaving the center empty. Stamp outlined flower in Berry Burst ink on top of bigger flowers and outlined small flower in Calypso coral ink over small solid flower (2 way stamping). Randomly stamp small leaf in Old Olive. Then fill empty space around flowers by stamping swirly image in Daffodil delight. 
  3. Adhere stamped whisper white piece to old olive CS. Wrap Daffodil delight ribbon and tie a bow toward the left side. Adhere the panel to the card front with dimesionals. 
  4. Stamp “Happy Birthday” on a piece of whisper white CS and punch with Pretty Label Punch. Punch another label from old olive piece. Cat the old olive label into 4 pieces diagonally and adhere behind whisper white label creating a border. Add the “Happy Birthday” piece to the card front in a center over the ribbon with dimensionals. 
  5. Add few berry burst and daffodil delight glitter dots to the card. 
If you need anything - visit my store. Thank you for your support.
Product List

Tuesday, June 13, 2017

You Make Me Happy

Hello, my stamping friend.
Did you notice "That little piggy" stamp set? Oh my, it is so cute. And that little piggy makes me happy by just looking at her. This is the card I created:
Isn't she really adorable?
This card made me realize what a perfect combination is new Lemon Lime Twist and Powdered Pink. If you also noticed - this card is using the same layout as the cards from my previous posts. I even use the new embossing folder again - it remains me of flowers.
Here is more cuteness for you:
 Have a great day!


Product List
Blender Pens
[102845]
$10.00

Friday, June 9, 2017

Say Hi to New In Colors

Say "Hi" to new members of our color family - 2017-2019 In Colors. I will be introducing them one by one.
Lemon Lime Twist - such a vibrant and fresh color:

 Powdered Pink - very soft and pretty
Berry Burst - happy and summary color (may be my favorite)
Fresh Fig - deep and sophisticated

Tranquil Tide - such an unusual and fun color. It actually looks different depending what other color you pair with

We made this set at our group get together and it was interesting that everybody's favorite was different. Now the choice is yours: what color is your top one?

Do not forget about Ribbon Share - available till June 18th.

To order new products - Visit my store using hostess code  HNDCV9RR .
 

Product List