Saturday, November 19, 2016

Christmas Team Stamp It Blog Hop

Hello, my stamping friend.
Thank you for stopping by. Today our team put together Christmas Blog Hop for you. Hope you will find many ideas and inspirations for your holiday crafting.
I am dedicating  my creations today to my daughter Sophia. She is away at collage and we did not stamp together for very long time! When I received Holiday Catalog back in August and showed it to her - Merry Mice was her favorite stamp set. Of course I needed to have it so we can stamp together. Unfortunately, I did not use this set yet (well, so many other beautiful products and so little time!). Sophia is coming home for Thanksgiving break and I wanted to have few samples with her favorite stamp. Here is what I came up with:
Stitched framelits add so much to any stamped image, and also shapes cut with them are beautiful on their own.
Here is little guy caroling - I think my daughter will like this one the best:
I used the largest owl and 2 second largest circles.
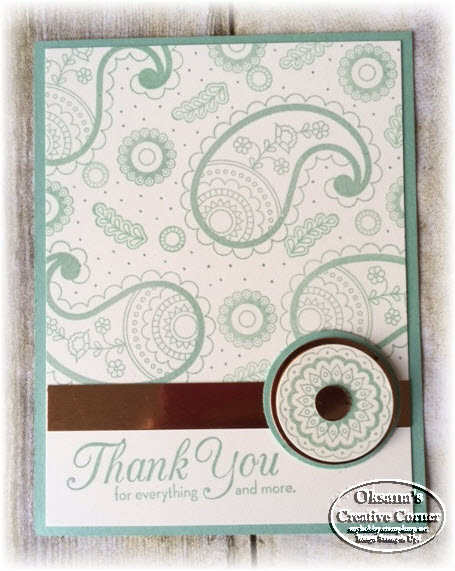
Another card using largest circle and 2 second largest for background:
There were no big enough shape to stamp those 3 little guys, so I enlarged the square to make a rectangle:
When you run you square through big shot - do not cut it all the way.
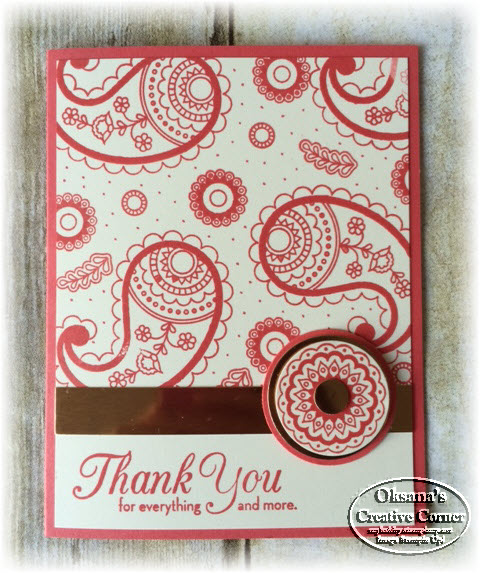
All 3 cards are very simple and easy to create. They include little coloring (what I am not that great at), but it is very therapeutic to sit and color.
What do you think about my design? Do you like "Merry Mice" stamp set? What about Stitched framelits? This stamp set is on 25% discount right now and Framelits available for limited time.
Leave me a comment for a chance to win a great prize:
For more ideas - continue the hop:

Product List
Blender Pens
[102845]
$10.00

Tuesday, November 15, 2016

Paisley in Review - Day 4

Hello, my stamping friend!
Let me confess - I am addicted to Paisleys and Poises stamp set. It is November, time to start working on Holiday projects, but I still can not put Paisleys away, and still using bright summer colors. Maybe because I am in Florida, haha. This is my latest project:

 How Tos:
  • Watermelon Wonder – 8 ½” x 5 ½”
  • Whisper White – 5 x 3 ¾”, scrap for flowers 
  • Pear Pizazz: 3 7/8” x 5 1/8”, scrap to die cut 4 leaves 
I got the idea from my own card I did sometime ago. Now imagine other color combo! What will you use?

Happy Stamping!

Product List

Monday, November 14, 2016

For You featuring Stitched Framelits

Hello, my stamping friend.
I finally had a chance to play with Stitched Framelits. Those are new framelits that are available in November only before they will be released in June 2017 in Annual Catalog. They make any accent piece look much better without additional work. Here is very simple card:

Measurements:
  • Night of Navy: 3 ¼” x 4 ¾”, scrap for circle punch 
  • Crumb Cake: scrap to punch out circle
  • Petals & Paisleys Specialty Designer Series Paper 3” x 3” 
  • Copper Foil: 3/8” x 3”, scrap to die cut circle 
  • Card Base is the Crumb Cake Note Card and Envelopes, finished card size is 3 ½” x 5” 
Instructions: 
  • Using the 2nd from smallest stitched circle die, cut out the copper circle. To avoid the scarred lines of your cutting pad to transfer to the foil sheet, lay a piece of computer paper between the die and the top cutting pad. 
  • Stamp “This Is For You” in Night of Navy ink on a scrap of Crumb Cake. 
  • Punch out words with the 1 3/8” circle punch. 
  • Punch out Navy layer with the 1 ½” circle punch. 
  • Adhere the words and the navy circle together with SNAIL adhesive. 
  • Attach the layered words to the copper stitched circle with a dimensional. 
  • Layer the Navy on to the note card base, then adhere the 3” x 3” piece of patterned paper. 
  • Attach the 3/8” strip of copper foil with glue dots. 
  • Adhere the stitched circle with the words to the card with glue dots.
This set is on 25% discount promo now!
Product List

Tuesday, November 8, 2016

Paisley in Review - Day 3

Hello, my stamping friend.
This set of cards using Paisley stamp set may be my favorite one. I created a card for my local class and decided to recreate it using every color in 2015-2017 collection. I loved them so much, I even created 20+ swaps for OnStage event in Atlanta.
The cool technique here was to use fine tip of the marker and dot randomly to fill the space. Here is close look for each color:


And of course I needed to decorate the inside:
What color is your favorite from those 5? I can not decide. This technique is very addictive and will look great in other colors. Give it a try.

Product List