Wednesday, May 31, 2017

Do Something Creative Every Day

Hello, my stamping friend.
I would like to share with you another card using Crafting Forever stamp set. This time I wanted to use all new In-Colors. It is so much fun to color the images in that stamp set. This card is bright and fun:
I actually designed this card for swap. To make it faster - I cut 1 inch strips of designer paper and adhere them to 4 x 11 piece of whisper white. Than I cut the 4 x 11 into 4 equal pieces - 2 3/4 x 4.
This set and new goodies will be available June 1st!
Hostess Code is: HNDCV9RR.
Happy Stamping!

Blender Pens
[102845]
$10.00

Wednesday, May 24, 2017

Eastern Palace Hello

Hello, my stamping friend.
Today I am sharing another card featuring Eastern Palace bundle. The die is amazing with endless possibilities. And the designer paper is so versatile. For the first time I actually used entire pack of the paper already!
Here is a card in Tranquil Tide (new In-Color):
Measurements: 
  • Tranquil Tide Cardstock - 11” x 4 ¼”, score and fold at 5 ½”, plus a piece for die cutting 
  • Very Vanilla- scraps for die cutting and punching 
  • Eastern Palace Specialty Designer Series Paper: Gold and Vanilla – 3” x 5 ¼”  
  • Eastern Palace Specialty Designer Series Paper: Tranquil Tide design – 1” x 4 ¼ ” 
Instructions: 
  • Add the Gold and Vanilla Eastern Palace Specialty Designer Series Paper to the card base with SNAIL Adhesive. 
  • Add the strip of Tranquil Tide Eastern Palace Specialty Designer Series Paper to the card front with SNAIL Adhesive. 
  • To cut the medallion: Nest the Easter Medallion Thinlits dies (as shown) inside one of the Layering Circles Framelits and die cut a piece of Tranquil Tide cardstock through the Big Shot. The Magnetic Platform is handy to keep the dies from shifting. Use the Die Brush to help get the pieces out of the dies. 
  • Use the same Layering Circle Die to die cut a piece of Very Vanilla cardstock to layer underneath the medallion. Use the Fine Tip Glue Pen to adhere the medallion to the Very Vanilla circle then add to the card front with SNAIL Adhesive. 
  • Die cut a smaller medallion out of a scrap of Very Vanilla cardstock, then use the 1 ¼” Circle Punch to punch it out. Add to the card front with a few dots of glue from the Fine Tip Glue Pen. 
  • Stamp the greeting with Tranquil Tide ink on the Very Vanilla and punch out using a 1” Circle Punch; Add two Stampin’ Dimensionals, plus add a small piece of Tear & Tape Adhesive to the back of the circle to hold the gold tassel. Adhere to the card front. 
  • For a final touch, add a small Eastern Gold Vinyl Sticker to the middle of the medallion.
Hope you like it. The bundle is available till the end of the month and is a great deal as you get 2 items included for free. Order yours today and receive set of cards from me!
Hostess Code is: HNDCV9RR.

  Product List

Friday, May 19, 2017

Sneak Peak: Congrats Card using Creative Forever Stamp Set

Hello, my stamping friend.
Here is a little sneak peak for you from upcoming Annual Catalog using Creative Forever stamp set. I was lucky to receive this stamp set when attending OnStage event in Amsterdam. Love all the images in this set, and also that it can be used to create masculine cards. We all know it is not easy to make cards for a guys.
This is very simple card. I used 2 strips of Eastern Palace designer paper, i think it is perfect fit.

Cutting Measurements: 
  • Smoky Slate: 5 ½ x 8 ½” 
  • Very Vanilla CS: 2 ¼ x 4” 
  • Tranquil Tide CS: 2 ½ x 4 ¼” 
  • Designer paper: tranquil tide with dapper denim dots – 1 ½ x 4 ¼” , dapper denim and gold – ½ x 4 ¼” 
Instructions:
  1. Create card front from Smoky Slate piece by scoring at 4 ¼”. Using small splutter stamp from Timeless Textures randomly stamp front of the card in smoky slate ink. Stamp greeting on the bottom of the card in tranquil tide ink. 
  2. Adhere bigger piece of designer paper to the center of the card and smaller on top of it. 
  3. Stamp 3 pens image on very vanilla piece in black archival ink. Squeeze Dapper Denim and Tranquil Tide ink pads to transfer some ink to the lid of the ink pad. Open it and using the ink on the lid and blender pen – color pens and area under them. 
  4. When colored image dries – adhere is to the Tranquil tide piece and then with dimensionals to the center of a card front.
What other color combo will work in your opinion?
You can order the stamp set and new color inks starting June 1st.

Happy Stamping!

Product List
Blender Pens
[102845]
$10.00

Wednesday, May 17, 2017

May Paper Pumpkin and New Promotion

Hello my stamping friends.
May Paper Pumpkin is here! I got my box Monday (the earliest I ever got it) and after opening it I could not sit still! Such a fun kit this month featuring donuts. I immediately wanted to make the cards from the kit - and I made 3 cards. Those donuts are so adorable. And guess what - my son asked if he can take one of the card to school for his friend! I think this is the biggest compliment.
Here is the video:

If you never tried Paper Pumpkin - now is a time to try it.

FIRST-TIME subscribers enjoy three months at 25% off!  
Offer Dates: May 11–June 10 
 Besides a great introductory discount, what are the other perks of having a Paper Pumpkin subscription?
  • The convenience of an all-inclusive kit arriving at your door every month. 
  • Exclusive photopolymer stamp sets and the opportunity to build a collection. 
  • Crafting time you can count on without a lot of prep work. 
  • Trying new techniques. •Creating alternate projects with all the goodies in the box. 
  • Getting together with friends to craft every month. 
  • Purchasing past kits and refills so the fun never ends. 
  • The quality of the products and variety of projects each month. 
  • Sharing ideas with a community of online crafters. 
  • The surprise factor!
Join the fun HERE

Monday, May 15, 2017

Eastern Palace Class Review

Hello, my stamping friend.
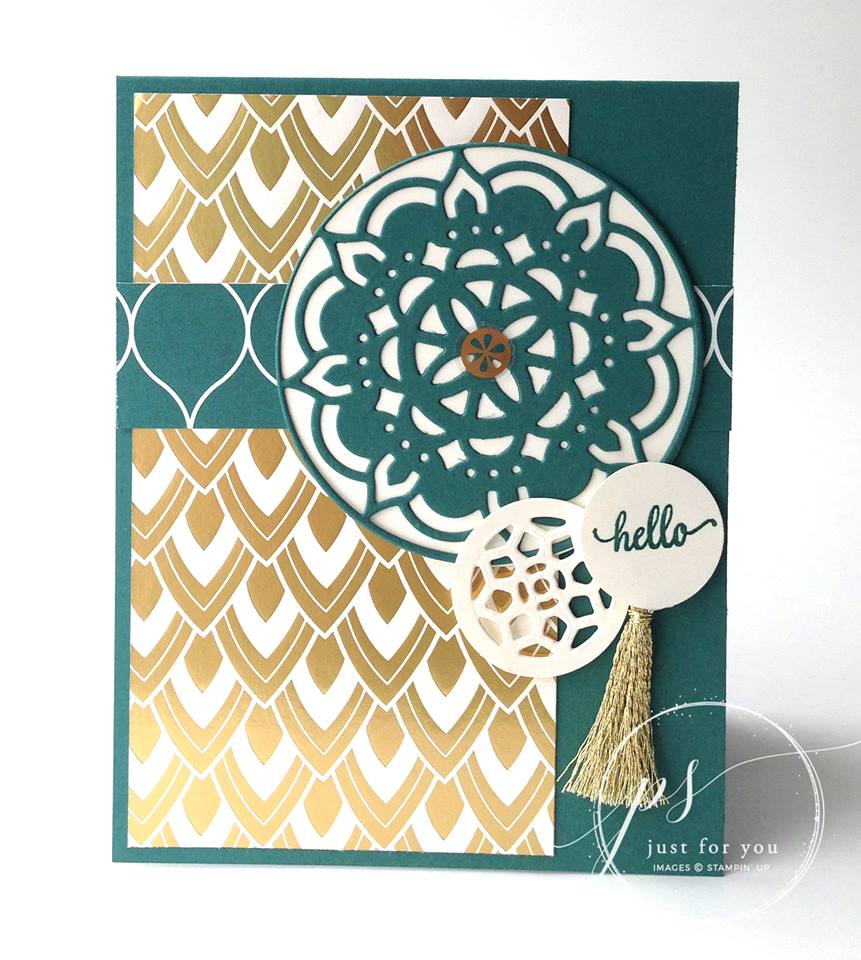
This Saturday I held Easter Palace class. Even so I love the bold colors of the Eastern Palace bundle - they are little to bold for me. I 'lighten' them up a little for the class and made the die and a stamp 'stars' of the cards. I also decided to go with simple design and create more cards. We made 6 cards total.
This one may be my favorite:
All the cards. This is my second set and I used 'thank you' and 'a note just for you' sentiments so I have some Thank You cards on hand.
A tip for you: it is much easier to stamp the image first than cut with a die when you do flower image and fancy square image. Otherwise it is pretty hard to stamp on already die cut paper.
I also created those fun favor boxes for my class - they matched the cards perfectly:
Want to know how to do them? Those are easiest boxes I ever made. I found plain white boxes in Dollar tree store - 12 for a $1!!! The front measures 3 x 3. So I just cut a layer 2 3/4 x 2 3/4 and piece of whisper white 2 1/2 x 2 1/2. I die cut and stamped the whisper white piece.
Order your Eastern Bundle and I will send you few of those cards as a Thank You.

Happy Stamping.


Wednesday, May 10, 2017

Another Oh So Succulent Card

Hello, my stampin friend.
I have another card to share. And once again it was using Oh So Succulent stamp set and paper. I used this card design to mass produce Thank you cards. They are relatively quick to make, can be for any occasion and great for mailing. I was not able to put this stamp away for long time, but now my pre-order from new catalog is here and I am playing with new goodies. i promise to share them soon.
Here is the card:

I used same colors as featured in designer paper. Stamping outline of succulent first was an easier way. This card could be stepped up by adding die cut images for extra dimension and some pearls/rhinestones. But I choose the simple version for mailing. Here is the look of my table - love to see multiples of the same card design:
By changing the sentiment - you can have cards for other occasions:
Oh so succulent Suite is retiring and is at great discount. Do not miss the great deal.
Happy Stamping!

Product List