

Supplies needed:
- Card base 8.5 x 5.5 scored at 4.25 ( Soft Suede in this example)
- Stampin Up! trimmer
- Another color of card stock 2.75 x 2.75 and 4 x 5.25 ( Crumb cake)
- Card stock to stamp on and for inside of the card 2.5 x 2.5 and 3.75 x 5 (Lost lagoon)
Step 1

Align left top corner of card base at 3" mark, cut from 2.5" to 4 7/8"
Step 2

Step 3

Step 4

Step 5
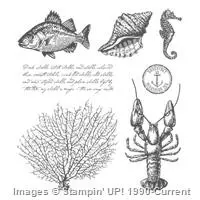
Stamp on 2.5 x 2.5 piece, adhere it to 2.75 square piece and then to the card front. Do the same with 3.75x5 piece, adhere it to 4 x 5.25 and than to the inside.Possibilities are endless. After you do one or two - it is super easy and quick to put together. Now the hardest part will be - what color and design to choose for your next Flip Corner Card.
Happy Stamping!
I would love to hear from you what do you think about this type of card fold.


No comments:
Post a Comment